Wednesday, January 25, 2012

How to use ESXi 5 as an NTP server - OR - How to permanently add custom firewall rules?

Recently my attention was caught by a question posted to the VMware Community forums that sounds odd at first sight: Is it possible to configure ESXi 5.0 to act as a NTP server?

I wondered why should you try to do this? On the one hand it is not recommended to use ESXi for anything else than the task that it was designed for: being a hypervisor. On the other hand it is not recommended to run a VM as NTP server, because exact timekeeping can be quite a challenge in VMs as they do not own a real hardware clock timer. So, should you run a physical box just for NTP? Small shops that have reached 100% virtualization run only ESXi on their remaining physical servers. So I can understand people considering an exception and wanting to run an ESXi host as NTP server - it is a very lightweight service anyway ...

Now back to the question ..., and the answer is: Yes, it is. In fact it is very easy to do this, because once you have configured ESXi 5.0 to act as a NTP client it will also automatically act as a NTP server! The NTP daemon (/sbin/ntpd) does both at the same time, and its configuration file (/etc/ntp.conf) even allows any other machine to query it by default. There is only one hurdle: the ESXi 5.0 firewall.
By default it blocks the port for incoming NTP queries (UDP port 123). We need to create a custom firewall extension to open that port. KB2005304 explains how to do this. Basically you need to create a custom XML configuration file in the directory /etc/vmware/firewall, e.g. /etc/vmware/firewall/ntpd.xml with the following contents:

<!-- Firewall configuration information for NTP Daemon -->
<ConfigRoot>
  <service>
      <id>NTP Daemon</id>
      <rule id='0000'>
          <direction>inbound</direction>
          <protocol>udp</protocol>
          <porttype>dst</porttype>
          <port>123</port>
      </rule>
      <enabled>false</enabled>
      <required>false</required>
  </service>
</ConfigRoot>

(Take care when you copy or modify this: The XML tags are case sensitive!)

Then load the new configuration by running the following command inside a ESXi shell:
  esxcli network firewall refresh

After that you can see the custom firewall rule in the firewall properties dialog of the vSphere client:

Custom "NTP Daemon" firewall rule
 Enable the rule, and you are done ...
... until the next reboot of the host, because User defined xml firewall configurations are not persistent across ESXi host reboots. The KB article that describes this problem also includes a work-around to resolve it: Put the XML file on a shared datastore and modify the /etc/rc.local boot script to copy the file to the correct location on every reboot.

This works, but I personally consider this an ugly hack, because this modification is not inherent in the system but introduces a dependency to an external resource (the datastore). So I created a VIB file that you can effectively install on ESXi and that will permanently add the XML file to the system.
Run the following commands inside an ESXi shell to install the VIB file:

   esxcli software acceptance set --level CommunitySupported
   esxcli software vib install -v http://files.v-front.de/fwenable-ntpd-1.2.0.x86_64.vib

The first command  is needed for ESXi to accept the custom VIB, because it does not include a trusted signature file. The second command will download and install the VIB file (Note: you can also download the file with a browser, store it on a local datastore and reference the local file with the install command).
The installation will not require the host to be in maintenance mode and it will be immediately effective without the need to reboot the host! It will also automatically reload the firewall rules, so the only step left is to enable the rule in the vSphere client.

By the way, I created this VIB file with a new and improved version of my TGZ2VIB5 script that I currently work on. Once I have finished this new version and made it available here I will also post a detailed description of how I created the VIB file.
Tuesday, January 24, 2012

Top VMware and Virtualization Blog voting 2012 now open

Just a short note: Eric Siebert has just opened this year's voting for the Top VMware and Virtualization Blogs. This blog is listed in the categories "Independent Blogger" and "New Blog" (and among "all" of course). Make yourself heard and vote here!

Wednesday, January 18, 2012

Hard to find HP tools: The Offline Array Configuration Utility (ACU)

If you have ever looked for a solution to a specific problem or the download page for a certain tool on www.hp.com then you probably know: Searching (and finding) something is a pain on these pages, and the more desperate you need it the longer it will take you ...
So maybe I will even make a series of "Hard to find HP tools" posts. Anyway I will start with the Offline ACU tool today.

So, what do you need this tool for? I had this challenge before and I reminded that when I came across this VMware Community forums post: Imagine you have an HP based ESXi host with VMs running on local disks attached to a Smart Array RAID Controller. You have run out of disk space and decide to add an additional hard disk to the server. Instead of creating a new (unprotected) RAID volume on this single disk you prefer to expand an existing RAID volume with it. This will give you more disk space and keep the current RAID protection level. How do you do that?
No problem, if you had Windows (or Linux) running directly on the box, because HP made available the Array Configuration Utility (ACU) for these operating systems. It will allow you to do the RAID expansion online while the OS is running. However, for ESXi this tool is not available as an online version.
This is why you need to use the Offline ACU tool. This is just a bootable CD with Linux and the Linux ACU tool on it. So, you need to schedule a downtime for the host (and the VMs running on it) and reboot with that CD to make the required changes to your RAID volumes. Not online, but better than nothing ...

You can find the download link to the current version of the HP ProLiant Offline Array Configuration Utility on my HP & VMware links page (in the General section).

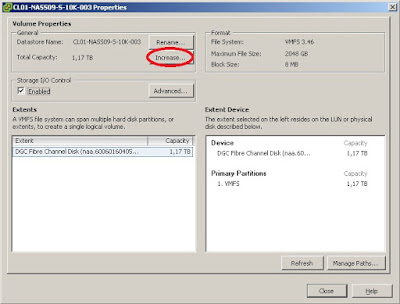
Once you have successfully expanded your RAID volume (and booted into ESXi again) you just need to do the same with the VMFS datastore that resides on it. Please note that since vSphere 4.0 you can grow a VMFS datastore online, and you do not need to use VMFS extents. Choose "Increase..." from the datastore's properties menu:


Friday, January 13, 2012

Undocumented parameters for ESXi 5.0 Active Directory integration

Since vSphere version 4.1 it is possible to integrate an ESXi host into a Microsoft Active Directory (AD). After the host is joined to the domain you can assign permissions to AD groups and users by connecting directly to the host with the vSphere client.
Instructions on how to do this (with ESXi 5.0) is available e.g. here in the VMware Online Documentation.

I first looked at AD integration when vSphere 4.1 was released and found one really annoying drawback in it that ruled it out from a possible implementation in our environment: When an ESXi 4.1 host is joined to a domain it will automatically (and repeatedly!) look up an AD group called "ESX Admins", and as soon as it finds this group it will grant this group Administrator permissions on the ESXi host. The real problem here is that the name ("ESX Admins") of this AD group is hard coded and can not be configured.
This may be a nice feature for small environments - you just need to create this group, fill in the necessary people and you are done. But if you think about an enterprise environment of a large company with lots of different sites, IT teams and vSphere installations, but only one Active Directory, you can not assume that all ESXi hosts in this company are managed by the same group of people.

When vSphere 5.0 was released I looked at the release notes and documentation to find out if this drawback was removed, but I did not find any positive information. Tests I did also showed that an ESXi 5.0 host behaves the same way, looks up the "ESX Admins" group and adds it with Administrator permissions.

However, recently I stumbled over the following when browsing the advanced configuration parameters of an ESXi 5.0 host:
Configuring the "ESX Admins" group
Yes, with ESXi 5.0 it is possible to change the name of the AD group that is automatically added by setting the advanced configuration option Config.HostAgent.plugins.hostsvc.esxAdminsGroup. You can even completely disable this functionality by setting the option  Config.HostAgent.plugins.hostsvc.esxAdminsGroupAutoAdd to false.
I searched for this again in the VMware documentation and the Knowledge Base, but did not find it being mentioned anywhere. So it looks like at the time this is completely undocumented, but it works as expected (I could not resist from immediately trying this out)!

Wednesday, December 21, 2011

How to do an Online Virtual Connect firmware upgrade

Okay, this is a follow-up to my previous post ... I was finally able to find out on my own how to do this. The answer is in HP's white paper "HP Virtual Connect Firmware Upgrade Steps and Procedures". This is a must read for anyone being concerned with the VC firmware upgrade process, I will try to summarize the most important points here.

You must use the Virtual Connect Support Utility (VCSU). The current version is 1.60 and is available for download here.

It helps to understand how the VCSU does the upgrade: First it uploads the new firmware to all VC modules simultaneously. This phase is absolutely uncritical, because the VC modules continue working normally during the upload. If you use the default parameters it will then activate the new firmware by rebooting the VC modules one after the other in a controlled manner - and this is the process that really impacts the network availability of your hosts and VMs!
Why? The controlled reboot takes 20 or more seconds, and - of course - the VC module will not properly forward and receive network traffic during that time. However, the blade servers, resp. their NICs that are connected to this module are not properly disconnected during that time, i.e. they do not get a link down notification! If you use the default failover detection method for your virtual switches (Link state only) the hosts will continue using the up-links to the module that is just rebooting, and this results in a loss of network connectivity.

So, how do you cope with that? One possible work around is to use Beacon probing as the failover detection method for the virtual switches. But in my opinion this is not the best and easiest choice. No, the real answer is on page 13 of the white paper:
"For the customer environments where changing Network Failover Detection options or HA settings is not possible, utilizing VCSU manual firmware activation order (-of manual) is recommended. In this case, modules will be updated but not activated and the user will need to perform manual activation by resetting (rebooting) modules via OA GUI or CLI interface. This option will eliminate potential of up to 20 sec network outage that may occur on a graceful shutdown of VC Ethernet and FlexFabric modules."
Using the manual activation order (parameters "-oe manual" and "-of manual") ensures that the VCSU will not gracefully reboot the VC modules at all. You then need to do that on your own (just manual), by resetting the VC modules through the Onboard Administrator (OA). When you do a hard reset of a VC module the connected hosts will immediately get link down notifications, just as if the module suddenly fails or loses all its own up-links because the external switch failed. You should just wait about 5 minutes for the resetted module to get fully online before you reset the second one.

If your ESX(i) hosts are properly and redundantly configured you will notice only a minimal network interruption during this process. In my test it was just a single ping drop.

Yes, that's the whole secret of doing an online VC firmware upgrade! For me only one questions remains: Why is HP making it so hard to find this information? If you search hp.com for instructions on how to do this you will find tons of useless and contradicting information on this topic, and even their own Support engineers are not able to give a quick and right answer to the question. At least, one of them sent me a copy of the white paper (he could not just provide a link to it, because he was not able to find it on the HP pages...).

Thursday, December 15, 2011

HP Virtual Connect firmware update - can you do this online?

I don't know the answer to this question, but I'm trying to find this out ...

We have two HP c7000 enclosures with Virtual Connect FlexFabric modules to connect to external Cisco Ethernet switches and Brocade FC switches. Both enclosures are fully loaded with 8x BL620c G7 blade servers running ESXi 4.1 Update 2.
Right now we are still able to completely evacuate an enclosure if we want to do maintenance (mainly firmware upgrades) on it, because we have stretched two clusters over both enclosures that each have not more than 50% of their capacity used.

However, given our current VM growth rate we will soon reach a point where this will be no longer possible (without purchasing and deploying a third enclosure). So, I'm currently testing and looking for ways to do an online Virtual Connect firmware upgrade without interrupting network and SAN connectivity. With all the redundancy that is in the enclosure this should be possible, and an HP engineer I lately talked to confirmed that this is indeed possible using HP's Virtual Connect Support Utility (VCSU), and he pointed me to its manual for instructions.

I remember that I already tried this method a while ago. I don't know the firmware and tool versions anymore that I did this test with, but it was not very successful. Although I followed the instructions given I noticed ping timeouts for up to 15 seconds during the upgrade process (I was pinging the hosts VMkernel address).

I just started a thread in the VMTN forums to get some input from others. Has anyone done this successfully? Is there anything to check and configure that is not obvious before trying this? Please share your experience by posting to the VMTN thread or leaving a comment here. Thanks!

Once I have found a working method I will of course update this post!

Update (2011-12-21): I found it ... Read about it in my next post!

Thursday, November 17, 2011

ESXi-Customizer 2.6 and Tgz2Vib5 1.0

I just published the new version 2.6 of my ESXi-Customizer script.

What's new:
  • With this version you are able to optionally create an (U)EFI-bootable ISO file for the installation of ESXi 5.0. (U)EFI stands for (Universal) Extensible Firmware Interface. This is going to replace the current BIOS firmware interface on modern PCs. Please note that the original VMware ESXi 5.0 ISO is already UEFI-capable, the new version of my script is just able to keep this possibility in the customized ISO.
  • The new version includes an additional utility script called Tgz2Vib5. With this script you are able to convert an OEM.tgz-style driver package (for ESXi 5.0 only!) into a VIB file. That is the "official" VMware format for software packages - read more about it in this earlier post!
I'd like to encourage the developers of community supported ESXi 5.0 drivers to convert their packages into VIB format (using Tgz2Vib5) before publishing them! The VIB format has several advantages over the traditional OEM.tgz format:
  • You can add descriptive meta data (like vendor/author name, version and detailed description) to the driver package
  • Unlike an OEM.tgz file a VIB file can be easily installed into an already running ESXi 5.0 system by running the following commands inside a local or remote ESXi shell:
      esxcli software acceptance set --level=CommunitySupported
      esxcli software vib install -v VIB-URL

    (The host must not run any VMs at install time, because it needs to be rebooted after the installation.)
  • A VIB file can also be updated with a newer version without having to re-install the whole system. This can be achieved by running the following command inside a local or remote ESXi shell:
      esxcli software vib update -v VIB_URL